Showing posts with label cute. Show all posts

Monday, 16 July 2012

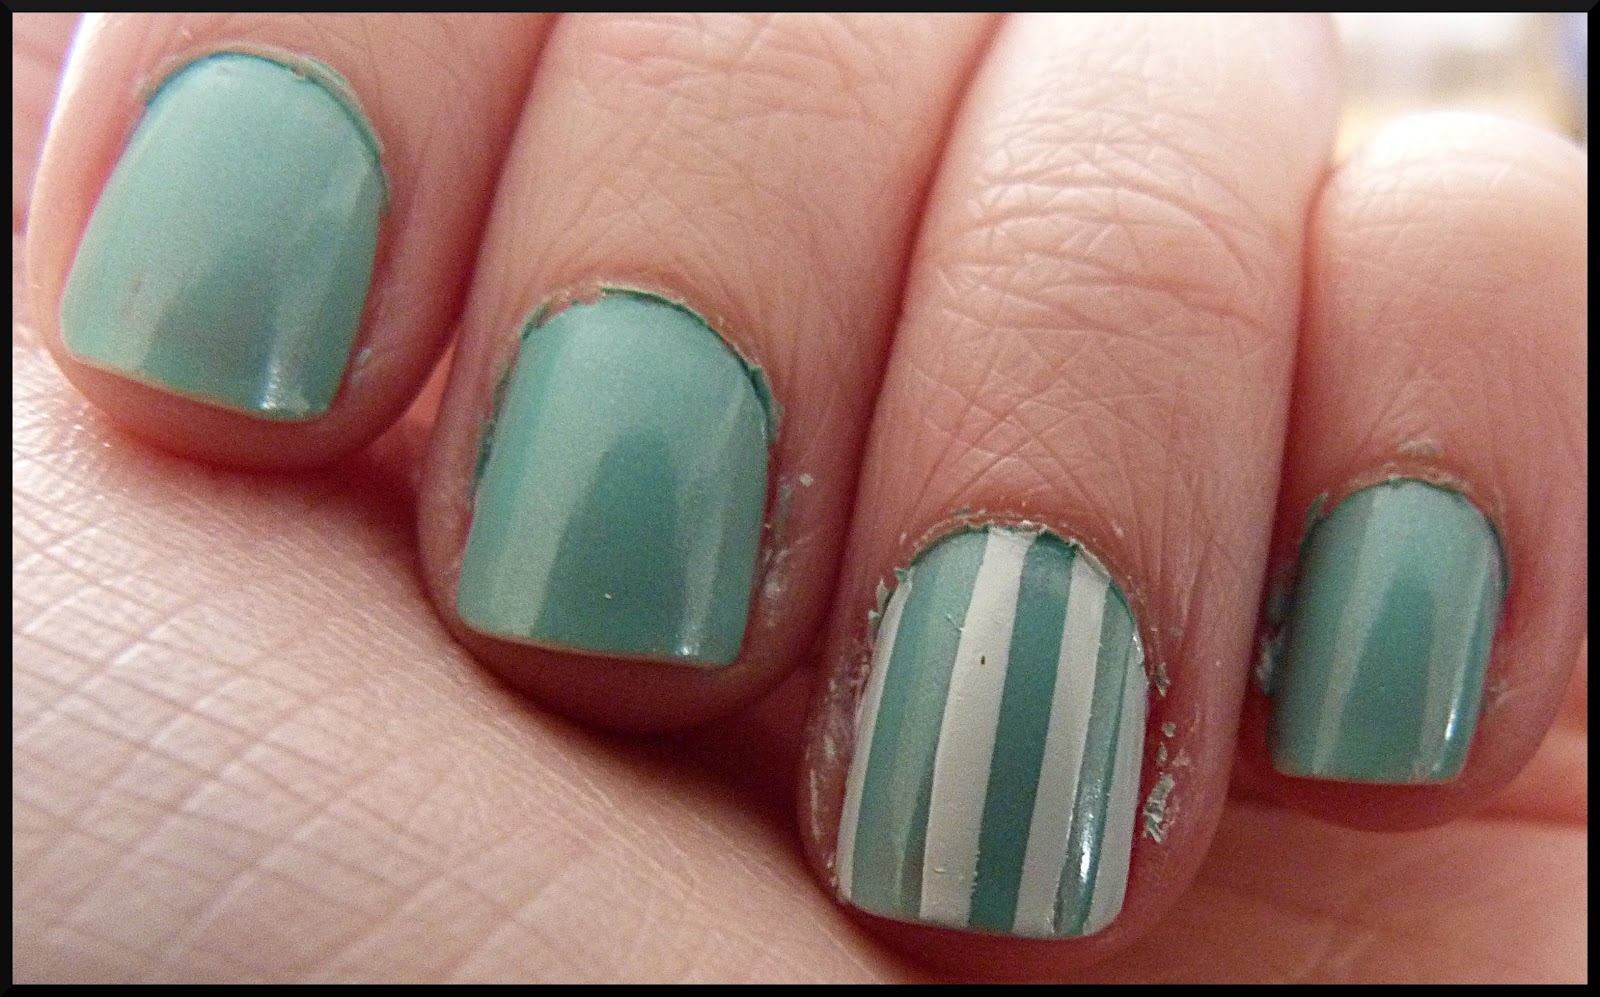
Pastel Chevrons (Competition Entry)


This is my entry for My Awesome Beauty's Competition.  If you click the link it will take you to the competition page.

I used 
Essie - Nice is Nice 
George - Smarty Pants 
China Glaze - White on White

I think they remind me of a clown outfit :) I really like them and I hope I win!


Tuesday, 26 June 2012

Cute Spots


Essie - Nice is Nice
OPI - Kiss me in my Tulips

I did these by painting three nails with Kiss me in my Tulips and two with Nice is Nice and left to dry.  Then used a hair pin to dot white polish onto the lilac :)

I love these nails haha they are really quirky!


Saturday, 16 June 2012

Cherry Blossom Nails


I got bored of my plain painted nails and my sister had just given me some flower nail stickers and a black nail art pen!  I am not sure where she got either of them exactly other than ebay.  

The stickers were not so good for nail art as the came off really really easily but it was fun just for the pictures! :)

What do you think of these?


Tuesday, 12 June 2012

Purple Tipped


Max Factor - Boji
Essie - Nice is Nice
Tape
Striping Tape

Firstly I got this idea from Pshiiit.  I have loved it for ages but never had a lilac to try it out with until now!  I bought Essie - Nice is Nice last week and I love it!  Three coats gives full coverage and it is such a lovely creamy lilac.  Here is how I did these nails:

  1. First paint your nails all over with your chosen base colour.
  2. Next once your base coat is dry put tape in a diagonal line so only part of the tips are showing and paint your second chosen colour.
  3. Remove your tape before the polish dries.
  4. Once this is dry take your striping tape and cut it to size and place over the line between the two colours.
  5. Finish with a couple of top coats to keep the striping tape in place.
I found that striping tape is very difficult to stay put!  It only lasted a day, but it was neat underneath so it looked fine when it did decide to come off!  


Monday, 11 June 2012

Flower Power


Not much of a talky post.  I will update if asked what I used :).  Here is flower Power!


Wednesday, 30 May 2012

Bow French Manicure


I did these a while ago but didn't have the best picture of them.  So here they are all pictured out :) complete with a little bambi!  I used:

China Glaze - White on White
George - Base coat
Black Acrylic Paint
Cocktail Stick
Manicure guides
Matte Topcoat

  1. First I painted two coats of the base coat (because my nails are REALLY stained!)
  2. Next I used the manicure guides to paint white on the tips
  3. Once this was dry I did another coat of the base coat
  4. Next I used the acrylic paint and cocktail stick to paint on the bows and lines :) (My tiny paintbrush got damaged so a cocktail stick is the next best thing i had!)
  5. Then a clear topcoat over that
  6. And finally a matte topcoat over it all (I LOVE matte french manicures!)
Julie 

It's Summer Time!


The sun is rarely seen where I live but the last two weeks it has been out and warm so I decided to do some summery nails.

I used the nailasaurus tutorial on gradient nails and it worked out great! 

I used Pshiiit design here on my nails.  I think that one or two more coats of clear polish would have evened the bumpyness of the sponging out but I was studying for my graded unit exam at the same time as doing these so I didn't get the chance too!

Let me know what you think!

Julie

Friday, 18 May 2012

White Dotted Tips


Finally I got round to having some spare time to do my nails last week :)  just getting round to posting them a week later !

These are similar to the dotted green tips I did ages ago but black and white! Here is how I did them:

China Glaze - White on White
China Glaze - Trousseau
Max Factor - Onyx
Topcoat
Toothpick
French manicure stickers

  1. Paint your nails all over with a natural nail coloured base (except your ring finger)
  2. Use the french manicure stickers as a guide to paint the white onto the tips (you might need two coats of this but make sure the stickers come off before the polish dries)
  3. Paint your ring fingers white
  4. Once dry use the black polish and a cocktail stick to place neat dots on the white
  5. Topcoat and your done!
Hope you like these!

Julie


Thursday, 3 May 2012

Dotty!


My second post today!  Im off ill from college with a horrible fluey cold :( . So in-between doing college work I have been playing about with my nails! :) Here is a soft polkadot design!

China Glaze - White on white
George - Sherbet Fizz
George - Smarty Pants
Colour Trend - Iced Pink
Kirby Grip

  1. I first painted my nails all over with china glaze white on white with 3 coats.
  2. Once they were dry I dotted one colour at a time over all my nails :)
  3. I sealed with a topcoat and finished with a matte coat!
Let me know what you think!


Nude Triangle Tips


Firstly I will start off with where I got the inspiration from which was Nailside :).  I saw this post on Chic Chevrons  last week.  I love all her designs and wanted to give this one a go.  I used a baby pink instead of the gold, and it didn't turn out as nicely as hers but I still really like them!

I used:
George - Basecoat
Max Factor - Onyx 
George - Sherbet Fizz

I wouldn't have used a base coat if my nails weren't so stained!  But here I used 2 coats of george base coat to even out the colour.  Next I used tape to line out a triangle shape and painted it with the black polish and left to dry.  Finally I used tape again to mark out where the pink would go and painted the pink layer also.  I finished with a topcoat :)

I hope you like these!


Sunday, 22 April 2012

White Glitter Mani


OPI - Don't touch my tutu
OPI - Pirouette my whistle
Marks and Spencer - White
George - Matt Finisher


Here is a matte white glitter manicure.  I used 4 coats of don't touch my tutu and 1 coat of pirouette my whistle, then using manicure stickers I painted my white tips and finished with  matte topcoat.


This is my first time using this OPI glitter polish and I love it.  It is so sparkly and full of glitter!  


I hope you like this mani!  

Saturday, 21 April 2012

Newspaper Nails


After painting my nails with my new OPI - my pointe exactly I realised that is is a great colour for doing newspaper nails.  I have tried these before and the writing came out smudgey or not very strong on most nails.  But these ones turned out great!  I think it must be based on the first nail polish you put down as well as how you apply the print onto your nails to get it nice and clear like this. Here is how I did it:

OPI - My Pointe Exactly 
George - Matte Finisher
Gin (60%) but any strong alcohol works
Cotton Wool
Bits of newspaper writing cut out to nail shapes

  1. I first painted my nails all over with the OPI varnish.  It took 4 coats to get it to a usable colour for these.  
  2. I waited till they were COMPLETELY dry (or you may have actual pieces of newspaper stuck to your nails!)
  3. I dipped my finger into the gin and then dipped the newspaper cutouts into the gin while holding it with tweezers.
  4. Then I carefully positioned the newspaper print side down over my nail the way I wanted it and covered it with the cotton wool and pushed down an even pressure all over my nail for about 20 seconds. 
  5. I removed the cotton wool and gave the newspaper a quick last push down to make sure as much ink got off it as possible and gently peeled it off with the tweezers.
  6. Any excess paper left on my nail I picked off with the tweezers gently.  But don't worry too much about little fluffys left because they are not noticeable after a topcoat.
  7. Repeat these steps with all your nails and you should have these!
  8. I finished with a topcoat and then a matte topcoat (because newspapers are not shiny :))
Hope this tutorial made sense and was easy to follow.  Leave a comment about how it worked for you and leave a link if you tried it out and snapped a photo :)

Julie


Tuesday, 17 April 2012

Cloudy Days


Had a lot of these recently :)  got the idea from Polish Art Addiction http://polishartaddiction.blogspot.co.uk/2011/09/skies-above.html  she suggested a bird or two on an accent nail so I thought I would give it a go.  These only lasted an hour because my right hand just turned out disastrous and I can't go out with my nails looking less that perfect :P

The white polish didnt go on too well for me yesterday so the clouds ended up looking a bit bumpy! 

I used:
George - Smarty Pants
Marks and Spencer - White
Max Factor Onyx

Sunday, 15 April 2012

Sparkle Tips


George - Witchcraft
George - Jackpot
George - Matt Finisher

First I painted my nails all over with the witchcraft colour.  Once that was dry I painted the tips (and one full nail) with 3 coats of the Jackpot glitter varnish and left to dry.  I finished with the Matt Finisher :)

These would be good christmas nails!

Thursday, 12 April 2012

Matte Sparkle French Manicure


George - Base Coat
George - Jackpot
George - Matte Finisher
Marks and Spencer - White Tip
French Manicure Stickers

I bought 3 new nail polishes today, again all 3 by george from asda.  All 3 only £1.75 each.  Bargain if you don't have much change to spare.  Also picked up french manicure strips while I was in also for 99p.  So much easier than fiddling about trying to cut tape into perfect curved strips!

Here I used 2 of my new polishes named Base Coat (a nice natural colour) and Jackpot (a delicate silver glitter polish).  I applied 2 coats of the Base Coat to my nails.  I used my new manicure strips to separate the tips, painted them with white polish pulled off the strips and left to dry.  I applied another coat of the Base Coat and left to dry.  Next I put on a coat of Jackpot and left to dry.  Finally I put a coat of the matt finisher on finish.  I have never tried a matt french manicure or a glittery one but I think it turned out really nice and natural especially with the matt finish.  The glitter is so subtle with the one coat, I really like it.

Has anyone else had any experience with any of the george nail polishes? Let me know what you think of them?  Let me know what you think of these nails :)


Tuesday, 10 April 2012

White Tipped


George - Smarty Pants
Barry M - White
George - Matt Finisher
Topcoat
Tape
Silver Tinsel

I first painted my nails all over the smarty pants colour.  When that was dry I taped of a diagonal line for the white to go.  Once the white was dry I put a topcoat on and used tinsel cut to the size of my nails to separate the two colours.  Another topcoat once it was dry and finally a matt topcoat.  


Circus Nails


George - Smarty Pants
Barry M - White
Tape

Excuse the messy bits around my nails! First I painted my nails all over with smarty pants, then once that was dry I cut out thin and thicker strips of tape and put them on the nails I wanted the designs on.  I painted white polish over that and peeled the tape off before it dried.  Circus nails!


Candy Nails


George - Sherbert Fizz
Barry M - White
George - Matt Finisher
Tape

I first painted my nails the sherbert fizz pink and waited to dry before cutting tape into small long triangles and putting them on the nails I wanted the design on.  Covered those nails with white nail varnish and peeled off the tape before it dried.  Finished with a matt topcoat.

Excuse the mess around my nails haha.

Friday, 6 April 2012

Polka Dot Lines


Here are my weekday nails. Just a quick paint with the bottom colour and then quick dots with my kirby grip, and then a topcoat.

Quick Easter Nails


These were just silly cute nails I did and managed to smudge straight after this webcam picture was taken so they had to come off :( 


I mixed my purple and yellow nail varnish with white nail varnish to get the lilacy and pale yellows :)


Here is the video I got the idea from: